 |
| Map of the Battle of Burgess Mill, Oct. 27, 1864 Horace P. Rugg Court-Martial Transcript, 95–100, Record Group 153 (LL-649), NARA. |
When I filled out the "pull slip" for Horace P. Rugg's court-martial file at the National Archives several years ago, I had low expectations. Too often, these folders end up being stuffed with disappointment. This one, however, proved to be a gold mine. The container bulged with a stack of folio-sized paper bound with a knotted pink ribbon. There was little sign it had been examined before, save for one reader sometime in the late 19th century.
 | |||
| Map Accompanying Hancock Report (O.R.) |
As the Confederate assault split the Second Corps in half, Horace Rugg froze in his tracks and failed to carry out orders relayed to him by one of Hancock's aides. The Second Corps survived the afternoon. However, in a few days, Rugg found himself immersed in a court-martial proceeding at the Globe Tavern south of Petersburg. The results of the tribunal put Rugg out of a job and out of the army. During the hearing, a clerk penned a lengthy transcript, which eventually made its way into that ribbon-bound folder in the National Archives. At the end of these sheets, I found this map (at the top of this post). It shows the movements of various units under Hancock's command and pinpoints the positions of Union forces, as well as some Confederate units, during the battle. It bears some resemblance to the map attached to Hancock's report in the Official Records (right). O.R. 42(1):233.
In Richmond Must Fall (Kent State Univ. Press, 2013), I wrote a detailed account of this battle using this map and other sources to guide the narrative. It was a complicated fight, ending in that audacious Confederate attack. On the anniversary of the battle, I'm happy to share this interesting sketch, which, to my knowledge, has never been published before. Here are some of the map's details.
Map Detail: Burgess Mill and Hatcher's Run
 |
| Burgess Mill on the Boydton Plank Road |
Map Detail: Burgess Tavern
 |
| Intersection of the Boydton Plank & White Oak Roads |
Map Detail: Hancock's Field Headquarters
 |
| Intersection of Boydton Plank & Dabney Mill Roads |
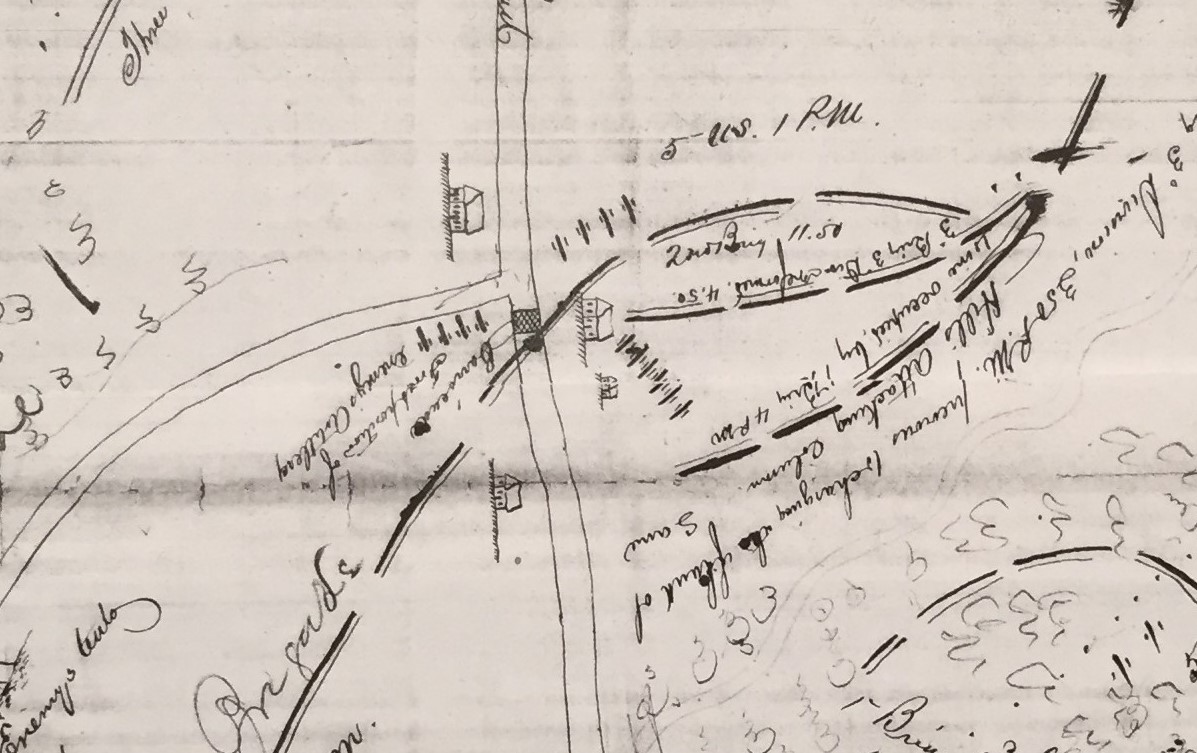
Map Detail: William Mahone's Attack

Mahone launched his assault late in the afternoon - at 3:45 p.m. according to this map. Approaching along a wood road, he formed a two-brigade front with the fourteen hundred men of William MacRae’s North Carolinians on the right and the Virginia brigade, about a thousand men, on the left. Deployed two rows deep, this battle line probably stretched for more than 2,000 feet. Mahone also massed the Alabama brigade, an additional thousand rifles, in column of regiments behind the front line. He spread a skirmish line on his left flank, using sharpshooters who positioned themselves at twenty-foot intervals. As the Virginians and Tarheels dressed to the colors, Mahone rode along the ranks encouraging his men, urging them to hold their fire and rely on the bayonet. “In a minute or two we were ordered forward,” recalled George Bernard in the 12th Virginia, “and came immediately upon the enemy’s line of skirmishers, who were in the woods not a hundred feet in front of us.”


